
Unit 4

Drawing of monster by third grader

Monster Project
For this project we turned third graders' monster drawings into sculptures.
Plan:
-wedge clay
-form body and head together
-build legs and have animal standing
-attach wings
-add final details
-fire and glaze
Reflection:
I was unsuccessful in getting the animal to stand up so I decided to make it sitting down. This made it much more structurally sound and probably helped with attaching the wings as well. It was hard to make a consistent fur texture and trying to make the tiger appear fluffy or fuzzy, a defining feature of tigers. I think that the eyes and nose are little too big for the size of the head, but they get the point across. The most challenging part of the project though was attaching the wings. They kept almost cracking off the back. I had to use clay to support the wings, making it hard to paint the wings and back, as the supports were in the way. If I were to make this project again I would want to make the facial features match the size of the head better and find a way to make the sculpture appear more fuzzy.


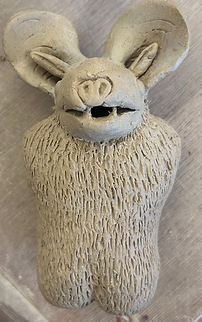

Alebrije

I made my alebrije based on the Pallid bat, a key stone species that is native to most the western U.S. and parts of Mexico. It is a keystone species because it eats insects that can spread diseases, such as mosquitoes. For more information, see the poster.
Plan:
- wedge clay
- make a ball and hollow out using a loop tool
- score and slip pieces back together to form hollow ball
- make the head using the same method describe above
- cut hole in body and head and score together
- form ears and make cut in head to form mouth
- use wire to make holes for wings and feet
- using a small loop tool and needle tool make fur texture
- paint with acrylic paint
- add wings with wire and paper
Reflection:
I think that the sculpture part of this project is done well, as it mimics the shape of the bat well. I think the painting job was pretty good, considering it was hard to find some colors of paint, but it was not the original color palette I had in mind. The wire wings are satisfactory, however I would have liked to spend more time making the paper part of the wings. The habitat was my least favorite part of the project. It looked pretty messy. While it looks okay from this given picture angle, there was actually a lot more of the cardboard base showing from above.


Lidded Box
I want to try making my lidded box on the wheel. However this might prove to be too challenging at my current ability.
Plan:
- wedge clay
- cone up and down a few times to help center clay
- make cylinder shape
- slowly close top of cylider
- add small lump of clay to top to make lid handle
- cut off top and trim to make lid seperate
- trim edges and clean up
- glaze and fire
Reflection:
At first this project seemed to be going very well. It was the most successful thing I have made on the wheel so far. I also thought it was awesome I was able to make a closed cylinder on the wheel and open it back up again to form a lid. These piece did not end up going in the kiln because the bottom became too thin and broke when I was trying to trim the bottom. The piece had also became not centered and got a little malformed by hitting the edge of the wheel. However, even with the bottom breaking, I am still proud of what I was able to accomplish with the project because I am still very new to using the wheel and I was actually able to get the lid to fit the top. If I had more time in class I would definitely want to try to make a project similar to this again.

Set of 3
I made a set of three instead of a set of four because they dried out over break before I could make the fourth one and I wanted them to all get fired as soon as possible so I could move on to more important projects such as the final for Semester Two and a piece for the Music and Art Festival.
Plan:
- wedge clay
- center on wheel
- make cylinder
- shape to make bowl
- glaze using midfire glazes
Reflection:
I had originally wanted to make the bowls a lot larger, but I was doing something wrong in my technique because the top part of the bowl rim kept falling off, leaving me with tiny bowls instead. These bowls are still usable however, so I decided to fire them anyway. I can use them for soy sauce or other dips for food. They dried out over Spring break so I did not have the chance to properly trim them on the wheel, but I was still able to get rid of the extra clay around the edges with a loop tool and a sponge. They still need to be glazed.