
Unit 2

Cut pinch pot
This was the first pinch pot I made. The sides were a little thick, but otherwise pretty uniform in width. Most of the projects on this age were built with pinch pots!


Single Pinch Pot Project - Mug
Plan:
- make a uniform width pinch pot
- make handle
- carve in pattern/design
- use underglaze to paint pattern
- fire and clear glaze to be used
Reflection:
The second image is the final project, complete with clear glaze. I like the size that the mug turned out and the bright colors, however if I were to do it again I would want to use glaze (instead of underglaze) to get a more uniform color for each of the designs because I dislike the texture of paint brush marks that were left from painting on the underglaze. I would also want to make it a little bigger because it shrank more in the kiln than I thought it would.

Double Pinch Pot Project - Bird House
Plan:
- Make 2 pinch pots of equal shape, size, and thickness
- Score and slip the 2 pots together
- Smooth out the seam between them
- Cut large hole for birds and add a frame around the opening
- Make a small hole for a stick (to make a perch for the birds)
- Make a separate top that is scored and slipped on to make a hanger
- Glaze the piece completely to make it water tight
Reflection:
I am satisfied with the shape of the bird house, although if I were to make it again I would want to make it more uniform in shape (and less lumpy in some places). I do like the size of it though, and hopefully the birds do too!
I have NOT glazed it yet, but I want to try the peacock glazing technique on it.
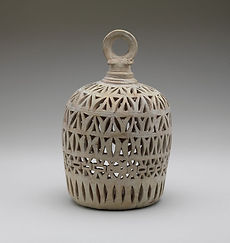


Historically Inspired Project - Lantern
Plan:
- Try to recreate the lantern, pictured to the left. The lantern is estimated to be from the 9th–10th century, and was excavated from Nishapur Iran.
- Originally I was going to make this lantern out of a double pinch pot. I made it this way the first time, but the sides were too thick to cleanly cut out the pattern.
- The second way I tried was making the lantern out of a slab for the side and connecting it to a bottom slab. I cut out the designs first, before making the slab 3D, however this was a challenge as well because of the number of holes - there was lots of cracking and it is not completely structurally sound.
- The third way that I tried was making a slab again, but I made it a lot thicker and let it cure over the weekend so it could become leather hard. After it was leather hard I shaped it into a cylinder. Once it could hold its shape I cut out each of the species to make the pattern. This is the strategy that worked and was fired.
- I plan either not to glaze it (like the original) or use matte clear glaze if possible.
Reflection:
I learned a lot through doing the project, especially about construction methods and the thickness that the clay must be in order to hold its shape. I like how the pattern and size of the holes turned out, but I don't like the overall shape (in comparison to the historical piece) of the lantern. It reminds me more of a water bottle than a lantern. If I were to make this project again I would want to make the lantern shorter and rounder to more closely match the shape of the original.

Small Animal Figure - Penguin
Plan:
- wedge clay
- shape penguin body
- add break and wings
- paint with underglaze
Reflection:
I made this penguin as a gift for a friend, and I am proud enough of it to give it as a gift! I like the shape and finished size of the penguin and it has nice facial features, however it is not as comical as I had hoped. I wanted it to look like it wanted a hug, and I think this feeling has mostly been accomplished. The underglazing is a little messy around the edges of the feet, but I like how bright the color turned out.


Mini Masterpiece - Jim Dine Blue Clamp
Plan:
- wedge clay
- roll slab
- add heart shape, "clamp," and texture
- paint with underglaze
Reflection:
I tried to match the pattern and colors that the original artist, Jim Dine, used as well as match some of the texture of an oil painting with lots of layers (including broom pieces in the original!), but I think I could have done better matching the colors. If I were to make this piece again I would want to make it larger, use more vibrant colors (especially red), and make the clamp smaller. I also did not achieve the same heart shape that Dine was able to achieve; in the original there is not a clear outline of the heart, unlike my rendition. I do like the texture that I was able to achieve to try and match the pattern of the oil paint.